Chocolate Whoopie Pies!

Comment

Chocolate Whoopie Pies!

This is our strawberry filling version! 

This is our strawberry filling version! 

Chocolate (Strawberry) Whoopie Pies!

 You’ve heard of the song, “Makin’ Whoopie”? Well, I’m gonna share how to make some delicious Chocolate Whoopie pies with a filling that can be modified to your taste buds (or seasonal flavors)!! I must thank Martha Stewart for the base of this recipe; however, as with anything, we’ve put our Will Bake 4 Food twist on it ;).

Ingredients:

Wet:

1 C (2 sticks) butter, room temp (I almost always use salted, and it didn’t seem to matter in this case)

2 C granulated sugar (I know this is technically a “dry” ingredient)

2 C buttermilk, shaken, room temp

2 Grade A Large Eggs

2 t pure vanilla extract

Dry:

3 ½ C All-Purpose Flour

1 t salt

1 ½ C baking cocoa. (I like to use ½ C of Hershey’s Special Dark; because of the need for the puff reaction between the cocoa and baking soda, we can’t replace the entire cocoa mixture with the Dutch processed cocoa.)

1 T baking soda

1 t baking powder

Filling:

¾ C granulated sugar

1/3 C water

1 T light corn syrup

3 large egg whites

1 T granulated sugar

½ t vanilla extract

1 t of an extract of your choice (this is DELICIOUS with a strawberry extract).


Other things you’ll need:

Handheld, with beater attachment or Stand mixer with both beater and whisk

Large bowl

2 baking sheets

Parchment paper or silpats

Small (1-2 oz) ice cream or cookie scoop

Heavy bottomed sauce pot

Candy thermometer

Piping bag and favorite tip for frosting


Instructions:

Let all of your wet ingredients come up to room temp; depending on your house temp, this could take 20-60 minutes. Preheat the oven to 400degF and place wracks in middle and lower third.

Prepare your dry ingredients: In a large bowl, whisk together the flour, salt, cocoa, baking soda and baking powder. Set this mixture aside.

Line two standard baking sheets with parchment paper or non-stick mat and set aside.

In the bowl of a stand mixer fitted with the paddle attachment OR with a hand mixer with the beaters, break up your butter a bit until smooth. Add the sugar and cream with the butter until light and fluffy (about 2 minutes).  Lightly beat the vanilla in the eggs and add to the butter mixture.

Next, I add the dry mixture and buttermilk by starting with 1/3 of the dry, then ½ of the buttermilk, repeat and end with the final 1/3 of the dry mixture. This dough is THICK (cocoa absorbs a LOT of moisture!)

With an ice cream or cookie scoop that’s about 1 oz. size, drop mounds no less than 2 inches apart onto your prepared cookies sheets. Bake for about 10-12 minutes. I like to finish one pan, put it in the oven on the top of my two shelves (middle of the oven); set the timer for 5 minutes; prepare the second pan and after that 5 minutes is over, move the pan in the oven to the bottom shelf and add the cold pan to top shelf. You’ve created a cookie factory! This rotation helps the cookies to cook evenly and spaces out the timing to allow for this rotation for all your batter. Also, you will never forget which pan was in first! If it’s on the bottom, it’s done when the timer beeps! Because the batter is so dark, it’s hard to tell when they’re “done.” You can insert a tester/toothpick in the center of a couple of the mounds, and if it comes out clean, you’re good to go. You might have to add a minute to the pans, but it’s not hard to keep track. When putting the pan onto the bottom shelf, always set time to 5 minutes and rotate, they’ll be great! Once baked, remove and let cool completely on a wire rack.

The shells on the right have been piped, and the left have been scooped. . . they BOTH work, but end up a bit "fluffier" with the scoop. 

The shells on the right have been piped, and the left have been scooped. . . they BOTH work, but end up a bit "fluffier" with the scoop. 

***Depending on your size needs, you can make these as big or small as you’d like, but you’ll have to adjust your bake time accordingly. We tried piping the batter, and though they were nearly as good, they stayed a little denser across the board when piped. If you’re going for a smaller cookie size, piping is WAY easier to get consistent size/shape. ***

After the last pan is on its last 5 minutes of the rotation, you can start to begin the frosting! This recipe of frosting makes a little too much, but I just made some meringue cookies with the remaining frosting (what I didn’t eat. . . ).

For the frosting:

Separate your eggs, don’t throw away the yolks! Make a fruit curd out of them! Place the sugar, water and corn syrup into a medium-sized, heavy bottomed pot. On medium heat, let the sugar start to dissolve, swirling occasionally. When the liquid is clear, you can increase the heat slightly and slip in your candy thermometer. When your thermometer reaches about 200-205 DegF, in a stand mixer fitted with the whisk attachment, start to whisk your egg whites until soft peaks form (I almost ALWAYS use a pinch of cream of tartar, but it’s not required here). Add the reserved tablespoon of sugar and whisk until your start to get stiff peaks. The timing here should work out perfectly, but if you’re not to temp with the sugar mixture, just turn off your mixer once your eggs are at nearly stiff peaks.

When your sugar mixture reaches “Soft Ball” stage or 240 degF, pull it off the heat, and with your mixer on “stir,” slowly drizzle the sugar mixture down the side of the bowl into the whites. Once it’s all in, increase your speed to Medium-High and let beat for about 7 minutes or until the bowl is cool to the touch.

Congratulations, you’ve now succeeded in the basic technique for an Italian Meringue! Here’s the “seasonal” part! After you get the meringue frosting to the bowl’s being cool, you can add a ½ teaspoon of vanilla and then 1 teaspoon of whatever flavor you’d like. Peppermint is great; I used strawberry, so that it was a bit like a “chocolate covered strawberry”! It’s possible to color the meringue, BUT you can’t use a gel coloring (ask me how I know!) as any oil will deflate the meringue; you’d have to stick with a powder coloring. An extract with color, will give the glossy white frosting a slight hue of the extract put into it.

Once your frosting is complete, scoop the mixture into a piping bag prepared with your favorite tip. Flip ½ of the shells over and pipe onto the flat sides and then cover with the other half of the shells.  OR you can scoop the frosting in between two shells (about 2 T per sandwich)!

Either way? You’ve succeeded at “Makin’ Whoopie”!! ;) Check out Track 7 below!! 
 

Comment

Classic Sourdough English Muffins

7 Comments

Classic Sourdough English Muffins

Classic Sourdough English Muffins

You’ve likely said, “I’d like an egg McMuffin.” OR have been walking into the store and have seen in bold “Nooks and Crannies!” Both of these require a classic English Muffin. Many recipes use Active Yeast and are a little quicker than the one that we’ve developed, but the flavor in ours is WORTH the wait, WE promise! Here’s how to make our Classic Sourdough English Muffins.

Ingredients:

Wet:

1 C of fed/proofed Sourdough Starter

1 C whole milk (fat content doesn’t matter)

1 C Buttermilk, shaken before poured (fat content doesn’t matter)

2 T honey

*4 T ghee or melted butter (for either, liquid form and cooled)

DRY:

Up to 6 C All-Purpose flour (we tested Bread Flour and the results made NO different in texture and taste for this recipe)

2 t kosher salt

1 t baking soda

¼ C corn meal or semolina flour


Other Stuff you’ll need:

11-13 Quart Bowl

Wooden Spoon (I use a “Spirtle”)

3-4 inch rim glass or cookie cutter that size

rolling pin

2 cookie sheet

2 clean kitchen towels

hot plate OR Iron Skillet

Cover to fit skillet

Canola oil

Meat thermometer (something with a probe; a candy thermometer won’t work here)

Wire rack for cooling

 Instructions:

Night before:

Turn on the oven to warm 100degF when you start to assemble.

In a LARGE bowl (11-13 quart), put in all of the honey, ghee and starter and a about ½ C of the whole milk. Stir enough to break up the starter so that the mixture is fluid. Add the rest of the milk and buttermilk.

Incorporate 4 C of the flour by sprinkling 2 Cups over the mixture and stiring; then repeat (your arm will get a work out by the end) You just want for all of the flour to be wet and combined. The mixture will look a bit shaggy and have some stickiness to it. . .

Turn the oven OFF and leave the light on. Cover your bowl with a plastic wrap, leaving a little hole for air and a towel. Making sure that the oven is no warmer than 100 deg (I have a “hot” oven), place your covered dough in the oven. You’re done for 11-16 hours. . . 

Next Morning:

Sprinkle cornmeal onto two cookie sheets. Remove the dough bowl and repeat the oven 100degF warming method (you’re basically making a “proofing” space).

Dough will have developed and proofed about double in size. Deflate the mass in the bowl and sprinkle the salt and baking soda over top. With your wooden spoon, start to fold the dough over on itself and sprinkle about ½ cup of flour over top and mix until incorporated just to make it not as tacky.

Just out of "dough bowl"

Just out of "dough bowl"

after the kneading process

after the kneading process

Dust a surface with a GENEROUS amount of flour (nearly a cup) and pour the dough out on the floured board. This is where you get the “workout!” Knead the dough for about 5 minutes by “fold, push, rotate method,” incorporating flour until you get a smooth ball. You’ll need to add a total of about 1 ½ cups of flour to the mass (more or less depending on feel and accuracy in the measuring of the wet ingredients the night before). I like to make sure that the dough doesn’t “rip” when my palm pushes into it. It should come together in about 5 minutes. Turn oven off, but leave the light on.

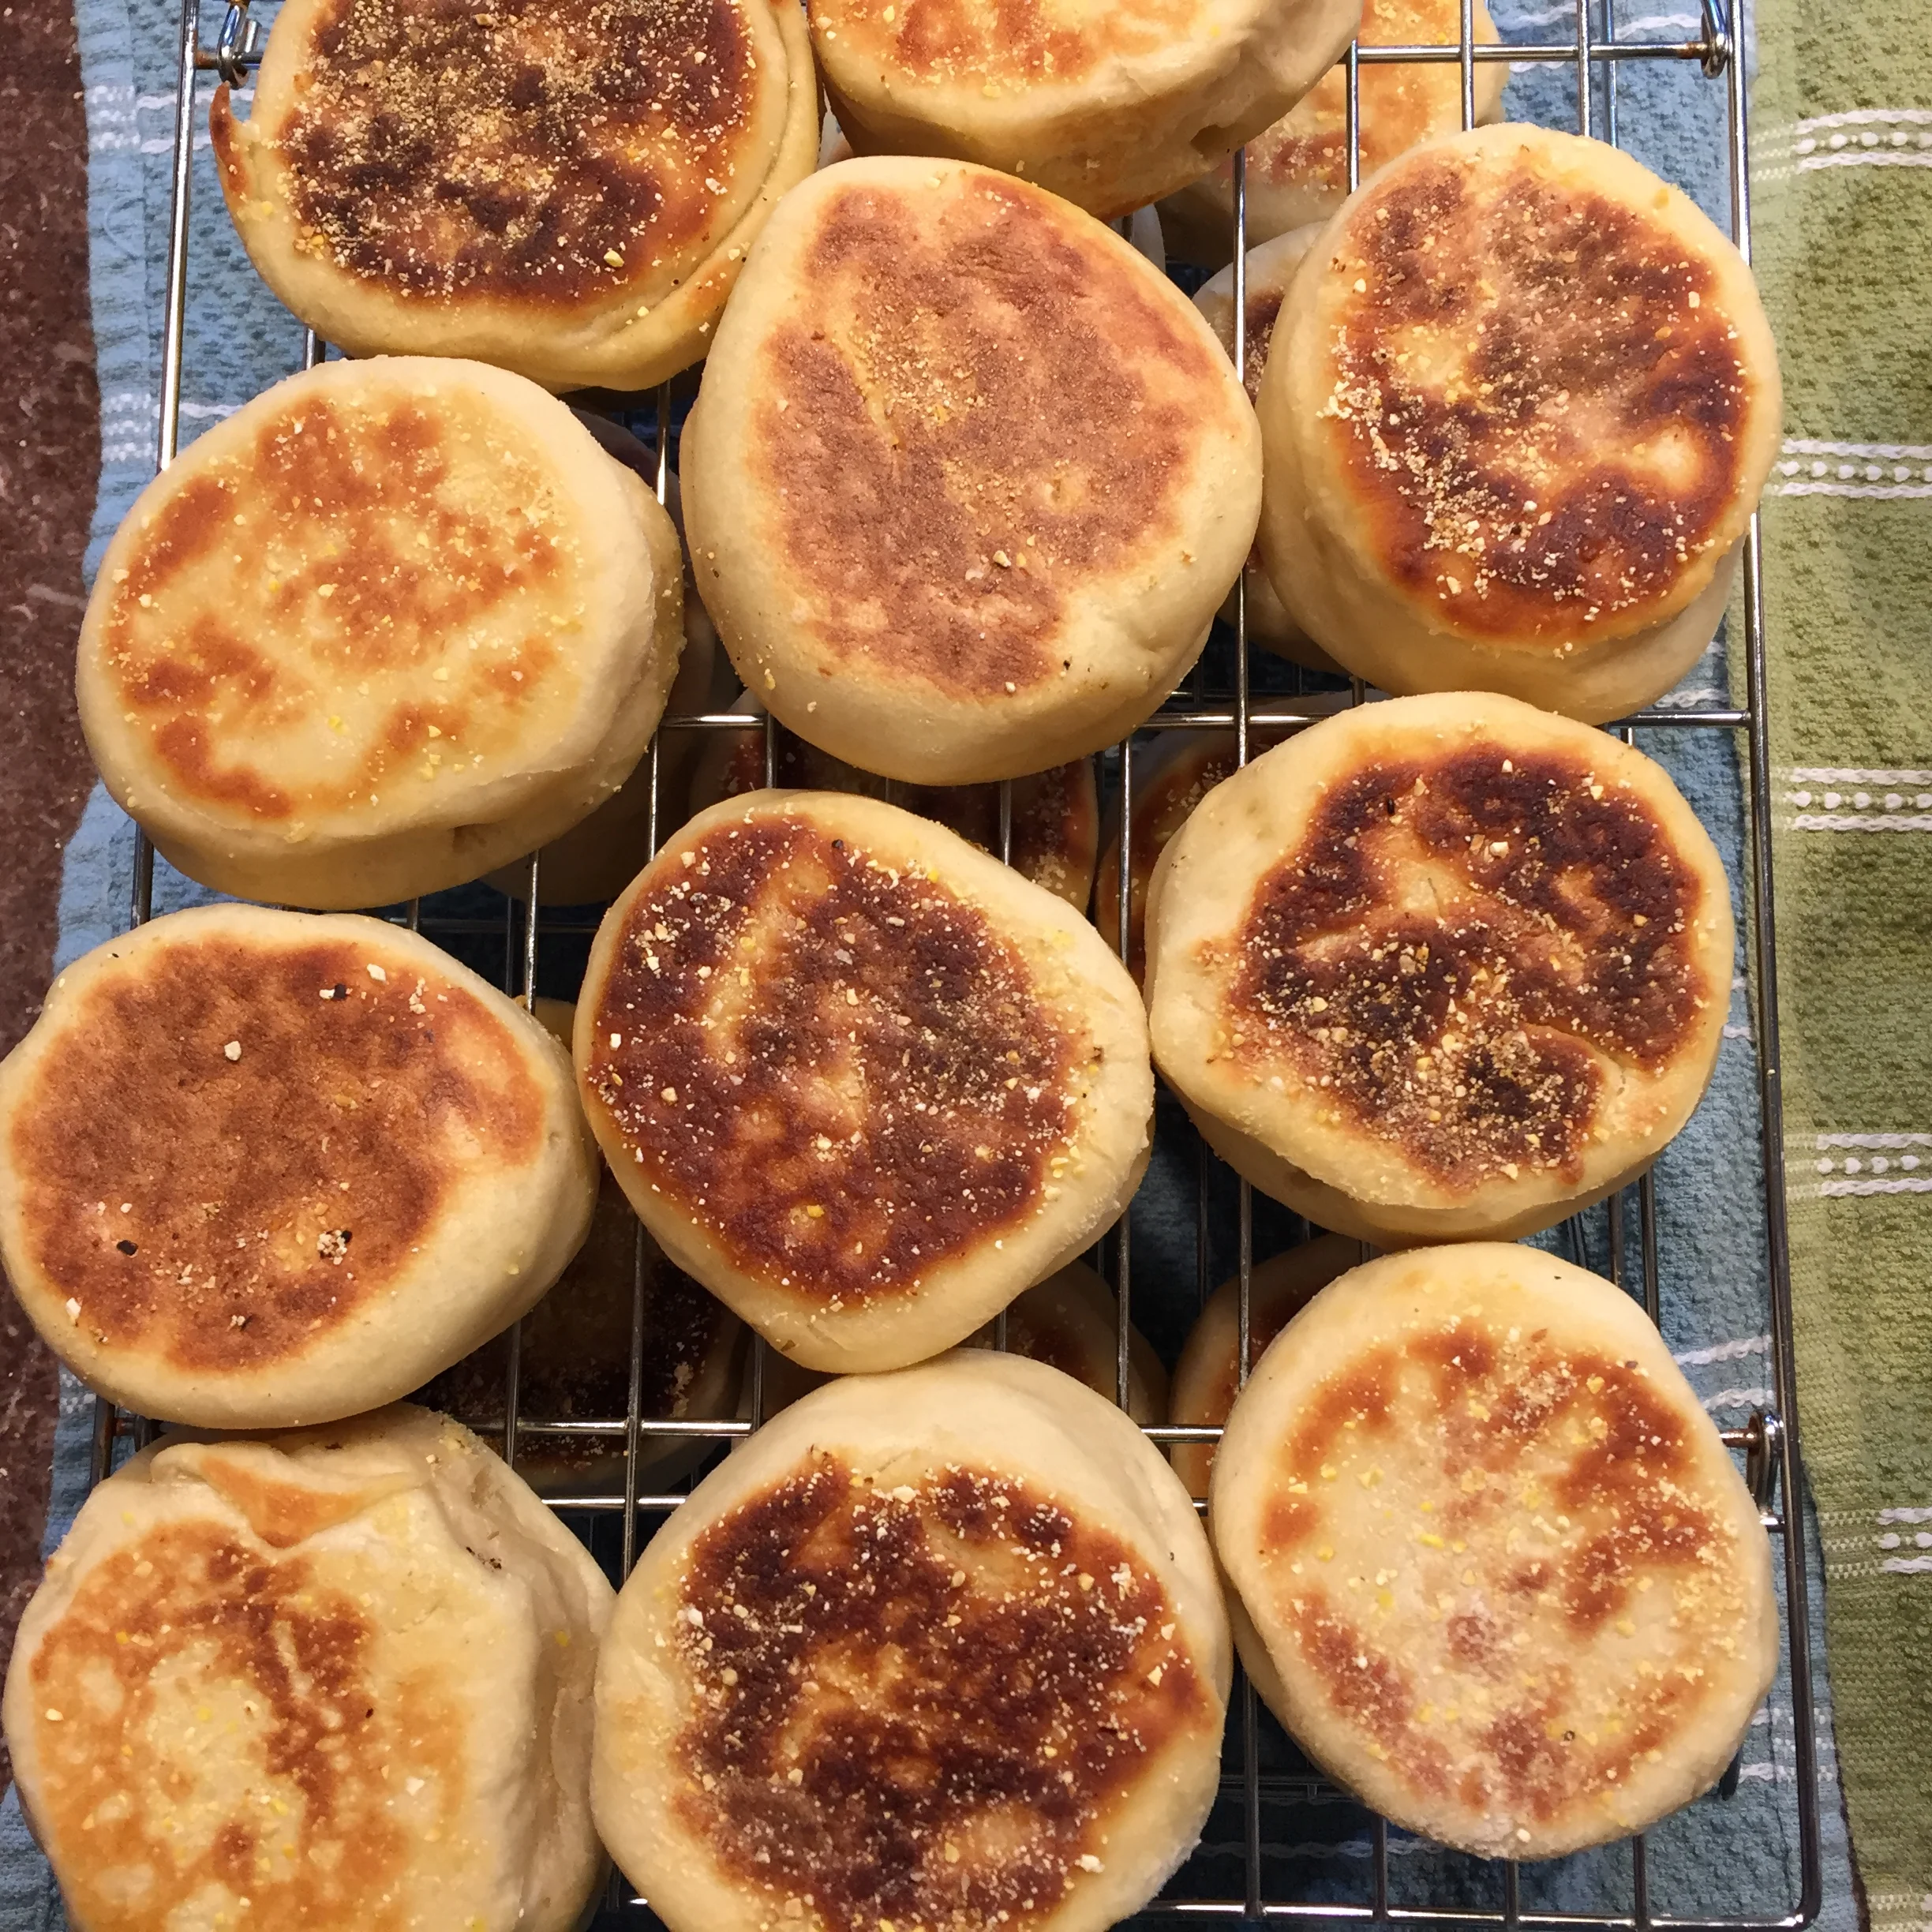
Once you have a smooth elastic ball of dough, take your rolling pin and roll the dough out until it’s about ½ inch thick. This seems a weird step for dough, I know. . . Take your glass or cookie cutter and cut out your shapes as closely together as possible. Place the rounds of dough onto your prepared baking sheets about 2 inches apart. WHAT DO WE DO WITH THE SCRAPS?!?!? The dough is still tacky enough that you can “re-knead” and roll the scraps and get more muffins. Waste not, want not! I usually get about 26-30 rounds using my 3 inch cutter.

 Sprinkle a bit more corn meal on top of each round and cover the pan with a clean towel and stick these in the oven (heat turned off, light on) to rest/rise for about an hour.

Here’s a variation that you may want/have to take. . . If you don’t have a skillet and cover (griddle instead), take the muffins out of the oven after 30 minutes of this proof and turn your oven to 350DegF to preheat. You’ll see why in a sec. . .

ENGLISH MUFFINS AREN’T BAKED IN THE OVEN, per se . . .

Get your skillet hot on medium low heat (if you have a griddle with a temp setting, about 350degF), and coat the pan with about 1T of canola oil. We tried several different kinds of oil, but I always got “smoke” at this temp with olive oil or butter. . . Uncovering only a few of your rounds, gingerly lift and then place into your hot pan being careful not to let them touch as the sides will remain tacky until cooked. Cover. Cook for 4-5 minutes and then turn over gingerly and repeat with covering and cooking for 4-5 more minutes. THE REASON for the covering is to keep the steam in! Probe the largest dough round on an outside of the pan and see if it has reached between 190-200degF. If so, you’re DONE!

 If you don’t have this opportunity for covering (or both sides are brown, but you don’t have the appropriate temp), place your muffins on a baking sheet and stick them in the preheated oven for about 7-10 minutes; this should achieve heating to the desired inside temperature.

Once your muffins are to the right temp and perfectly brown, remove and let cool completely on a wire rack.

IMPORTANT! Do not take a knife to cut the English muffins. The proper way to “cut” is taking a fork and probing the side in and out, all the way around.

IMG_5456.JPG

These will store in an airtight container for about 4 days! You could also freeze them. There are a LOT, so if you’re not feeding an army, it may be overwhelming to eat them all; although, they are so good that you want to!


7 Comments

Raspberry FRENCH macarons!

1 Comment

Raspberry FRENCH macarons!

Have you ever been walking in a downtown location and all of the sudden you see a specialty shop that has these little sandwich type cookies? The sign says, “Macarons”! You automatically say it out loud and think, “I’ve had a macaroon, but it ain’t nothing like that.” (in my accent at least.) Though these two cookies come from the same origin, the term isn’t misspelled, these are FRENCH macarons! They are hard to make, but with a little practice (and some Will Bake 4 Food tips), you’ll have a successful Macaron in NO TIME (well, a couple hours. . . )

Ingredients:
Shells:
WET: 
90-110 grams of egg whites(3 medium to large eggs), aged at least 2 hrs at room temp. 
*1/8 t of cream of tartar
35-45 grams of white sugar (about 3 T)
Red dye, about dime sized blob. 

DRY (size doesn’t matter, but weight does): 
100-110 grams of Almond Flour
200-210 grams of Confectioner’s Sugar

Buttercream Filling: 
WET: 
5 T butter, room temp
1 t vanilla extract (If ONLY using vanilla or Almond is good, up the measure to 1 T)
*1/8 t raspberry oil extract
Red Dye, About dime sized blob

DRY: 
80 g (about 1/2 cup) confectioner’s sugar, sifted

Other Stuff you’ll need: 
Kitchen Scale
Sieve
Parchment paper
2 cookie sheets
2 Piping bags
½ inch tip (2A wilton is what I have)
Hand mixer with whisk and beaters
*Stand mixer fitted with paddle attachment.

*indicates an item that can be modified/is optional

Instructions: 
The night before you know you’re going to make your cookies, separate your eggs and leave them on out in a bowl with a paper towel over them. Don’t measure them now, they will “age” and dry out slightly changing the weight. If you can’t achieve this time frame due to a busy life (believe me, I KNOW), bring your eggs to room temp, separate and leave sit at least 2 hours: the LONGER the better because the egg whites break down and whip up much better the longer they age. 

You can do this now, or before you start the actual “macaronage” process: Line two baking sheets with parchment paper and prepare your piping bag with tip. Once you have your tip in the bag, twist and stuff the twisted part of the bag into the bag side opening in the tip so that the batter won’t run out; place tip end in to a large drinking glass and fold down the edges of the bag around the outside of the cup. 

With a mixing bowl placed on your scale, tare/zero the scale set on the GRAMS so that you get an accurate measurement of the egg whites. You’ll get between 90-110g. I’ve tried to separate out and get an exact measurement here, but it’s WAY easier to manage the weight of the dry ingredients. Set your eggs aside. 

Next, put a separate bowl and the sifter on the scale, tare/zero, and measure out your almond flour. Now that you know what your egg whites are, take your measurement and use that as your baseline for a 1X1 measure for the almond flour; THEN add 10g. I had 92g of egg whites, so I ended up with 102g of almond flour. If you don’t have a scale, it’s hard, but you can succeed. This ends up being about 1 Cup. 

With this mixture in your bowl, tare/zero your scale and measure your confectioner’s sugar. You want 2x1 ratio here: we had 92g of egg whites; that would be 184g. I like to add about 15-20g more. . . So I went to 204g. 
Sift the almond flour and confectioner’s sugar mixture together about 4 times. Make sure to whisk them together at some point between sifts to make sure that the ingredients are well combined. MANY tutorials suggest putting these into a food processor to combine. If you use that method, you’ll still have to sift to extract any lumps, SO, I skip that step. ONE less thing to clean too! 

After sifted, set aside. It’s time to make the meringue!

There are 3 basic types of meringues: French, Swiss and Italian. I’m using a French here: Put your cream of tartar in the egg whites and with a hand mixer fitted with the whisk attachment, break up the egg whites until they become frothy. Then start to add your granulated sugar about 1 T at a time, whisking in between. You want to bring your egg whites to a pretty firm peak (takes 3-4 minutes).  Once they are to a firm peak, incorporate your food coloring; incorporate completely and bring to a stiff peak. NOW, you’re ready to macaronage! 

With our ratios, we’ve basically added 30g extra of dry ingredients to help to stiffen the batter and keep from over mixing. The part that is quite possibly the place that all of this work can go completely wrong! About a 3rd at a time, sprinkle your dry ingredients overtop of your meringue and “fold” in: Cut down the middle, scoop to the left or right and turn the bowl, repeat until incorporated. Add the second 3rd, repeat; final 3rd and repeat. 

The consistency that you want is like “lava”. . . I’ve never seen that in person, but basically once the mixture is about where it will flow off the spatula and sink back into the batter, but still kind of hold a peak for a couple seconds, it’s ready. The batter will be glossy; one of the other things I look for is a “jagged” edge once the batter is lifted up out of the mixture. If it’s too “smooth” and like silk, it’s over mixed. If you’ve gotten there, don’t throw it away! The taste will be great, you just have to be careful when piping. . .  You can see this in my video demonstration MUCH better.  
After your batter is ready, put it into your piping bag; untwist the end and holding it straight up and down, pipe out about 1 ½-2 in. mounds about 2 in. apart on your parchment paper. After all the batter is piped, pick up your pans and drop them evenly to get out air pockets. (I drop/tap mine about 5-6 times). 
NOW, turn on your oven to 300degF and let your pans sit for a minimum of 20 minutes to allow the shell to dry out a bit on the top.  Humidity is NOT your friend here!  After 20 minutes, test by touching the top, if the better sticks, allow 10 more minutes and check again. If the batter still sticks, go at 5 minute increments. Eventually, they will only “dent” and not stick. Once they “dent”, they’re ready to bake! Place in the oven for 13-15 minutes. I only bake 1 sheet at a time. I did both and rotated once and almost all of them broke. . . Check and make sure the shell lifts off of the parchment paper cleanly, then they’re done. 

Once baked, pull from the cookie sheet to cool. Some tutorials just pull the parchment right off of the pan; um, I did that. . . they all were everywhere. . . Put on a cooling rack and allow to cool completely (about 30 minutes). 

While your shells are cooling, make the buttercream filling. With your paddle attachment in a stand mixer/beaters on a hand mixer, beat the butter until fluffy and pale (about 3 minutes). Add the sifted confectioner’s sugar; once combined, add in your flavor and dye (if using). Put buttercream in another piping bag. Set aside for a second and pair your cookies. I always end up with slightly different sizes (the first couple of times, they were DRASTICALLY different sizes; again, flavor is GREAT). Once matched in two rows, flip one row over and pipe out some butter cream and sandwich the two matched sides together! 

The more these age and soak in the moisture from the buttercream, the better these get. I store them in the fridge in an air tight container overnight and then they’ll last up to a week. I mean, they won’t stay uneaten in my house that long . . . LOL 

Et voilá!! You have made Raspberry French Macarons! 

1 Comment

Chocolate Dipped ORANGE Shortbread Cookies!!

Comment

Chocolate Dipped ORANGE Shortbread Cookies!!

CHOCOLATE DIPPED ORANGE SHORTBREAD COOKIES!

Did you ever have one of those chocolate oranges that you could bust apart on the counter and enjoy a slice at a time? These cookies will take you back in time with a little twist of citrus and dipped in a delicious chocolate!

Ingredients:
WET:
¾ pound butter (3 sticks), room temperature (I always use salted butter)
1 C of granulated sugar
1 t pure vanilla extract
*2 t orange/flavored extract
DRY:
3 ½ C All-Purpose flour
¼- ½ t salt (can adjust depending on un/salted butter)
Granulated/*Turbinado sugar for sprinkling.
*DIP:
6-8 oz semisweet chocolate, finely chopped (6 is almost not enough, but 8 is a little too much, BUT enough to lick the spoon; not that I’ve EVER done that ;)).

Other Stuff you’ll need:
Stand/Hand mixer for creaming butter
Plastic wrap
Parchment paper (I Did several tests, for my oven, parchment did WAY better than a silpat)
Rolling pin with measuring markers of some sort
Cookie Cutter (I use square or heart shapes most)
Wire wracks for cooling
Double boiler/pot of boiling water and bowl to melt chocolate.
*indicates optional ingredient

Instructions:

In a medium size bowl, mix together DRY ingredients and set aside.

Place room temperature butter in the bowl of your stand mixer fitted with the paddle attachment. Break it apart just until it starts to coat the bowl. Add all of the Sugar and cream together. Scrape the sides of the bowl a couple of times to ensure all of the sugar and butter mix together. Add in extracts and beat in until combined.  Scrape bowl at least one more time. . .

Dump in the Dry ingredients into the bowl and slowly combine. Once your mixer starts to “grunt” and the dough begins to gather on the paddle, you’re ready to turn out onto a floured surface and bring it together.  Bring your dough into a disk/rectangle shape and cover with plastic wrap to chill in the refrigerator for at least 30 minutes. It can stay up to 2 days. . . Longer and it could dry out.

Preheat your oven to 350degF.

Lightly flour your work surface; take the chilled dough and cut in half. Cover one half of the dough with the plastic wrap, and with a rolling pin, gently start to roll out the other half to about ¼ inch thickness. The dough will have cracks, it’s okay. . . (at least I think it’s okay LOL).

With a cookie cutter (I like something that has an even edge like a square or a heart; points tend to cook much quicker. . .), cut out your shapes and place them on the parchment paper lined pans. If you have too much flour on the bottom from your work surface, go ahead and dust that off. Sprinkle the shapes with some Turbinado or Granulated sugar and bake for 18-20 minutes; the thicker the cookie the longer the bake time. Mine end up about 3/8 inch thickness; so if yours are ¼ inch thickness, you will need to bake a little longer (22-24 minutes).  The thinner the cookie the larger the yield too!  Repeat with the other half of the dough. Pull the cookies out and cool on the pan for about 3 minutes and then remove to cool completely on a wire wrack.

NOW, you’re cookies are done and delicious, BUT this step will add a little surprise for your consumers and it’s not that hard!  Put your parchment paper from baking on a flat surface. Melt your chocolate in a double boiler; melt until smooth and then dip one corner of each cookie into the chocolate; place on the parchment paper and let the chocolate solidify for about 5 minutes. Store in an airtight container for up to a week (they won’t last that long, TRUST!)

Et voilá!! You have delicious chocolate dipped shortbread cookies!

Comment

HUMMINGBIRD CAKE!!

Comment

HUMMINGBIRD CAKE!!

FIRST off, no hummingbirds were harmed in the making of this cake.
Secondly, I’ve made this cake for YEARS! Thank you Art Smith for the recipe. As all things get better with age, many of the components of this have changed. Though it doesn’t have our “Will Bake 4 Food” Branding, here’s an example of my making this with my sous chef from YEARS ago!

Here is the recipe that I used for this iteration:
Ingredients:
DRY:
3 Cups self-rising flour
2 Cups granulated sugar
1 t ground cinnamon
½ t salt
WET:
2 C chopped ripe bananas, (It was about 3 bananas for me)
1 C crushed pineapple, about 15 oz can drained
1 C vegetable oil
2 large eggs, beaten
1½ t pure vanilla extract
ICING:
8 ounces cream cheese, at room temperature
8 ounces butter (2 sticks), at room temperature
1 lb. confectioners' sugar (about 4½ cups sifted, after sifted/aerated, it yields a GREAT deal more)
1-2 t vanilla extract (depending on taste preference)

Instructions:

Position racks in your oven to middle and lower 3rd of the oven.  Preheat oven to 350degF
Lightly butter/ dust with flour 2 9inch cake pans. I like to use the Baker’s Joy instead! If you would like to use parchment paper in the bottom of the pan, now’s the time! I’ve had no trouble with the cakes sticking, but maybe I’m just lucky?

In a large bowl, sift together all of the dry ingredients; also, whisk so that they are evenly distributed.

In a separate bowl, whisk or stir together your wet ingredients.  You don’t want the bananas to be complete mush, so I would avoid using a mixer here.

There are TWO schools of thought here, in the video above, I absolutely follow the recipe to a T! In my experience, I’ve learned that incorporating a little of the dry into the wet at a time is the most successful method. SO, about 1/3 at a time, sprinkle the Dry ingredients over the wet ingredients and fold in with a spatula. . . I use a Spirtle!

Divide the batter evenly between the two prepared pans. I now use a scale to make sure that I’m within a ½ oz. between the pans. If you want to “eyeball” it, make sure that there is about the same amount in both pans or ONE will cook mega fast and the other will take like 3 days! LOL

Bake in the preheated oven 30-35 minutes (it takes 39 minutes in my ancient oven) on the center rack.  I rotated my pans after 15 minutes because I have a hot spot in my oven. . . the tell of “Doneness” is when the center is set and springs back when you push on it. For me, about minute 35, there would still be finger prints visible when pushed. . . by 39 minutes, it bounced back! Once finished baking, pull the pans out and let cool for about 10-15 minutes before “de panning”.

“Depan” by loosening the cake from the sides with a butter knife, then placing a wire rack on top of the pan, invert the pan. The cake is now upside down! SO, with another wire rack, put the cake right side up to cool completely.

While your cakes are cooling, you can prep your icing! With a hand with beaters or stand mixer with whisk attachment cream together your cream cheese and butter until fluffy, then add in vanilla. Add in the confectioner’s sugar a little at a time while on low speed until there aren’t loose particles of sugar and then put it on high speed to mix a beautiful frosting.

This is the way we did it: if using the additional butter cream, once your buttercream (s) are done and your cakes are cooled, we get to put it together! Place one layer right side up on your serving platter; then use the additional lemon buttercream to cover this with an even layer. Then put the next layer upside down on top of the icing. This results with a flat top! NOW, with an offset spatula, spread the cream cheese buttercream over the top and sides as if making a “crumb” coat. Fill a piping bag with a star tip with the remaining cream cheese buttercream and decorate to your liking*!

Additional Icing for in between cakes:
½ C vegetable shortening
½ C (1 stick) of butter
1 t vanilla extract
2 t lemon extract*
4 C (1 lb.) of confectioner’s sugar, sifted (yields much more once sifted/aerated)
2 T of milk for thinning
*Indicates an optional step/ingredients

Instructions:
Beat together butter, shortening, vanilla, and lemon until fluffy. Add in sugar a little at a time with mixer on slow speed. Then turn it to FAST and mix until fluffy. Add milk a little at a time while mixing until you achieve the consistency that you want. We only did about 1 T because we wanted it a little thicker.

If you are in a rush, but still want this delicious confection to take to a party/work, follow the above directions and skip the additional buttercream and piping.  Layer the cakes with about 2/3 C of the creamcheese buttercream in between them and then using offset spatula, coat the outside with the remaining buttercream!

The cake can be made about a day ahead and be stored uncovered in the refrigerator. Let it stand out about an hour to allow the cream cheese to soften before serving!

Et voilá! You have a hummingbrid cake!

*indicates an optional step/ingredients

Comment