-
June 2018
- Jun 11, 2018 CREATETV Cooking Challenge 2018!
-
March 2018
- Mar 27, 2018 Pie Crust (PÂTE BRISÉE)
-
January 2018
- Jan 27, 2018 "Special" Ingredient Fudge!
- Jan 2, 2018 Chocolate Citrus Almond Cookies
-
November 2017
- Nov 27, 2017 Browned Butter Snickerdoodles
-
October 2017
- Oct 19, 2017 Pineapple Upside-Down Cake!
- Oct 4, 2017 Citrus Dream Bundt Cake
-
September 2017
- Sep 19, 2017 Candied Lemons
-
August 2017
- Aug 30, 2017 UNholy. . . NY Style Bagels
- Aug 9, 2017 Vanilla Pastry Cream
- Aug 2, 2017 Angel Food Cake
-
July 2017
- Jul 26, 2017 Cake Pops!
- Jul 19, 2017 Tart Crust
- Jul 5, 2017 Brown Sugar Buttercream
-
May 2017
- May 5, 2017 Pineapple Fruit CURD!
- May 3, 2017 Chocolate Whoopie Pies!
-
March 2017
- Mar 29, 2017 Classic Sourdough English Muffins
-
February 2017
- Feb 9, 2017 Raspberry FRENCH macarons!
-
January 2017
- Jan 27, 2017 Chocolate Dipped ORANGE Shortbread Cookies!!
- Jan 23, 2017 HUMMINGBIRD CAKE!!
- Jan 3, 2017 Bread Pudding!!
-
December 2016
- Dec 22, 2016 Pumpkin "Spice" Cheesecake
- Dec 21, 2016 Stabilized Whipped Cream
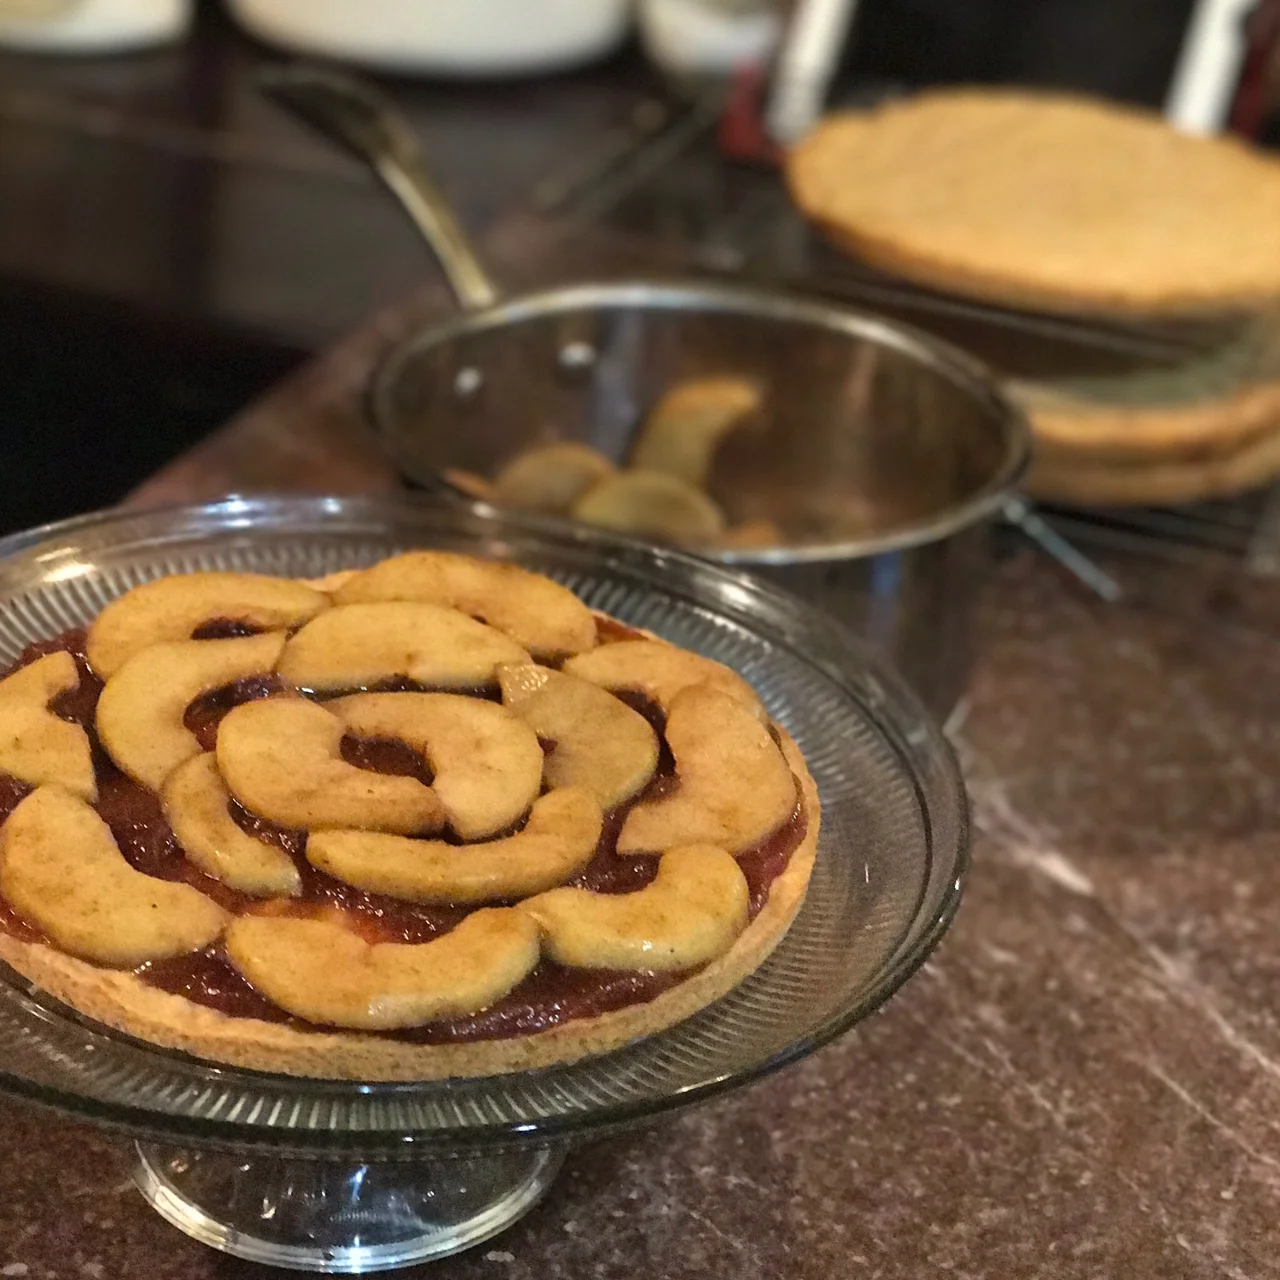
- Dec 19, 2016 Apple Stack Cake Cake Cake!!
- Dec 18, 2016 EASY Caramel Sauce!
- Dec 7, 2016 Will Bake 4 Food Archive
-
October 2016
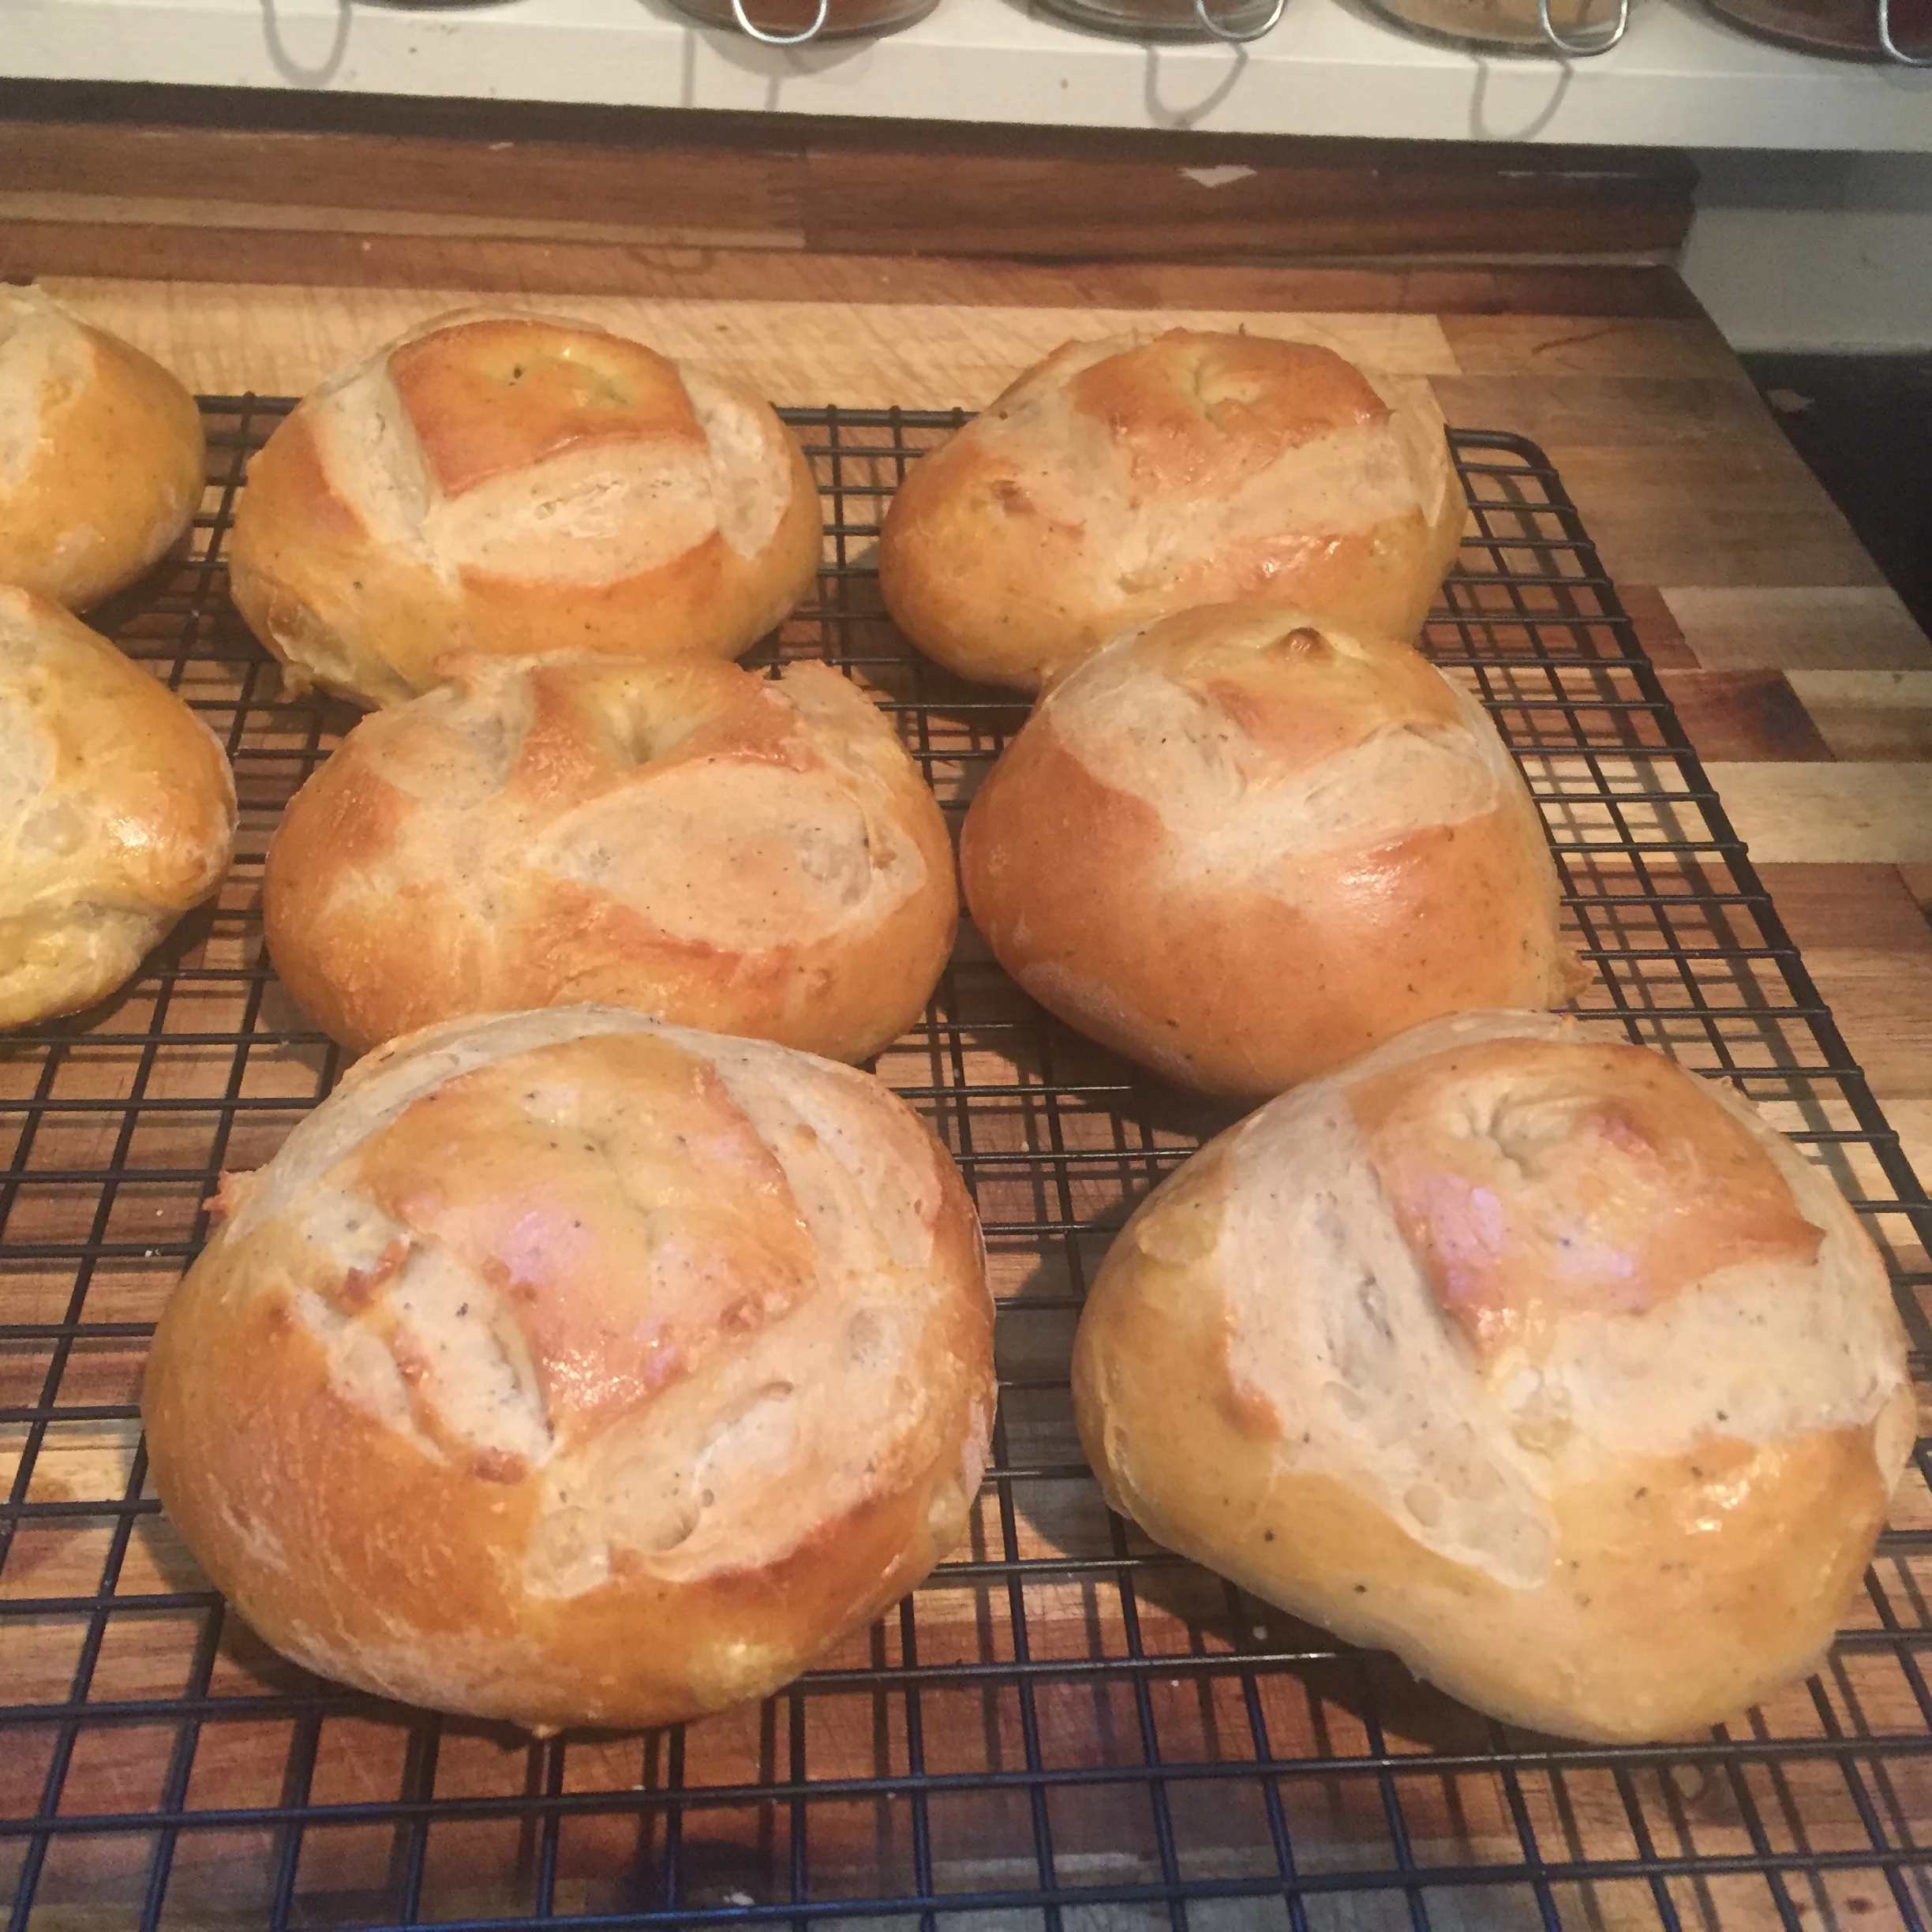
- Oct 2, 2016 CHALLAH! (that will make you Holla!)
-
September 2016
- Sep 10, 2016 Testing recipes!!
-
August 2016
- Aug 24, 2016 Piquenchagne (French Pear Bread)!
- Aug 22, 2016 "It's a Pizza" with The Food Hussy!
- Aug 17, 2016 #homeandfamilyhomecook ENTRY!
- Aug 5, 2016 Lemon filled Pâte à choux!!
- Aug 5, 2016 Homemade Croissants
- Aug 2, 2016 Lemon Cream Cheese Danishes!
-
July 2016
- Jul 29, 2016 Italian Lemon Ricotta Cookies!
- Jul 29, 2016 "Cheddar Bay" Biscuits!
- Jul 29, 2016 "Opera Cookies"
- Jul 25, 2016 Homemade Marshmallows!
- Jul 17, 2016 The Food Hussy's Peach Cobbler!
- Jul 10, 2016 LEMON CURD!!
-
June 2016
- Jun 12, 2016 Strawberry Scones!

Hello Everbody! It's will! We're trying a new title: Will Bake 4 Food! I'll make a bread or dessert and you make the main course!! :D
Let us know what you think! Here's my tutorial of Lauren Groveman's Challah Recipe! For her Explanation: http://www.laurengroveman.com/recipes/breads/six-strand-challah/

Here's what you knead (HA!)
Ingredients:
8 oz (1 stick) of butter (salted is what I use)
1 cup of milk

1/3 cup of sugar
2 T of Honey
2 1/2 t salt
(she calls for raisins, but I didn't use any)
2 pkgs active dry yeast (4 1/2 t)
1/2 cup lukewarm tap water
Pinch of sugar
5 medium OR 4 extra-large eggs
Up to 6 cups of Bread Flour
Course Kosher Salt for sprinkling
Cornmeal for pans
Egg and 1 T of water for egg wash
Other stuff that you'll need:
2 LARGE bowls (one for the proofs and one for mixing)
Canola oil spray
Mixing spoon (I use a spurtle)
Pastry scraper for the kneading and measuring
Kitchen Scale (if you can eyeball it, this are optional. . . )
Heavy bottomed sauce pot
Instructions:
Pull out your eggs so that they can come to room temp.
(TRICK! if you don't have the 20 minutes for this, in a bowl, put some hot tap water and put your eggs in it. They'll be room temp in about 5 minutes. I do this ALL of the time).
In the sauce pot, put your butter and milk over medium heat until there is just wisps of steam coming from the milk and the butter is completely melted. Take it off the heat and let cool.
Measure out your lukewarm tap water and put the yeast and pinch of sugar in. Mix it ever so slightly to help get all the yeast wet.
Prep your "proofing" bowl now. Spray with Canola oil and measure out your plastic cling wrap too, spraying it as well. Set aside.
Now it's time to get your ingredients combined!!
Put Sugar, Honey and salt into a large bowl whisking slightly, this will be sticky. Then add the eggs whisking each one as you add it in. You'll have a smooth egg mixture once you're finished.
Add in your butter and milk mixture slowly, while whisking the eggs as to not "cook" them. Your mixture should have cooled down by now and your yeast should be "bloomed". So, pour it in and whisk it all together!
Now for the Flour addition! Sprinkle 2 cups of the flour over top of your liquid mixture and start to mix with a wooden spoon.
Keep adding the flour one cup at a time until you have a "shaggy" mass that starts to move together.
Lightly flour a surface and pour your dough out to start the kneading process. "One clean hand, one dirty hand". Use a pastry scraper to help keep your dough from sticking to the surface. Keep adding flour until you have a nice dough that doesn't stick to your hands. I should be like a big blob that will still move around but isn't too stiff.
Make it into a bit of a smooth ball and place it into your greased bowl and cover with plastic wrap. Place in the oven with only the light on (or a warm place) for 1 hr 45-2 hours. After first proof, Punch down the dough and knead in the bowl to redistribute the yeast, recover and stick back in the oven for another 1 hour to 1 hr-15 minutes until billowy.
Once second rise has happened, punch down the dough again and pour out onto a clean surface. divide as evenly as possible. You want about 10 even balls of about 5-6 oz a piece. I like to divide into 2 and cover one half while I work with the first half.
Once you have your balls created, it's best to let them rest a bit, about 15-20 minutes covered with a clean kitchen towel.
Here's the time to start preheating your oven to 375degF and prep your baking sheets with parchment paper/silpat and sprinkling cornmeal to prevent from sticking.
To make a five braid loaf: roll your balls of dough by folding them inward then elongate until you have a long strand, c. 12 in. long with ends tapered. put 5 of the strands together at one end so it looks like an 5 tentacle octopus. From the outside, bring one strand over and then under ending in the middle. Go to the other outside strand and repeat. Once you reach the very tip, mesh all of the strands together and tuck underneath. (the video has a MUCH better explanation of this process. . . ) Place the braid on one of the prepared sheets and cover for about 15 minutes to let it rest. Uncover and then brush with egg glaze (if you're using a seed topping or sea salt, now's the time to put it on the egg wash) and leave exposed for about 5 minutes. Place in the oven on the middle wrack for about 25-35 minutes. The dough will expand when baking and if desired, take out about 20 minutes in and brush the newly exposed white with more egg wash.
To make dinner rolls: roll your balls of dough by folding them inward then elongate until you have a long strand, c. 12 in. long. At this point, cut it in 1/2 and then continue to elongate one side until it's about 10 in. long and very thin. Take the strand and tie a knot, then tuck the top side of the strand underneath and the bottom side on top. . . (again, the video has a MUCH better demonstration of this). Place the rolls on one of the prepared sheets and cover for about 15 minutes to let rest. Uncover and then brush with egg glaze (if you're using a seed topping or sea salt, now's the time to put it on the eggwash) and leave exposed for about 5 minutes. Place in the oven on the middle wrack for about 15-25 minutes.
The Challah is finished when you can tap on it and it sounds hollow and it's a lovely golden color; For the braid, I like to tap the more white sections to test it; if they don't sound hollow, it needs to cook a little more. . .
Serve warm! This makes a DELICIOUS french toast after a couple days too! SO GOOD!

Hello everybody! I've been a busy bee with a few tester recipes! Trouble is, that takes time! Sorry that I haven't blogged in a bit. Leave me a comment and let me know your recent confections!

Sometimes a layer cracks...
Hello Everybody! I've searched the internet for this recipe after a suggestion from one of my mentors, Kelly Hale!! Here is Bernard Clayton Jr's "Piquenchagne" from The Breads of France (with some #bakingactor touches, of course).

Ingredients:
Pear mixture:
2 medium pears (mine were small, so I used 3 and different kinds)
1/2 C water
3/4 t cardamom*
1/2 t cinnamon*
1/2-1 t ground pepper
Dough:
1 package Active Dry Yeast (2 1/4 t.)
1/2 C milk or water, warmed to 110degF
2 T canola oil*
2 1/2 T honey
2 t salt
2 eggs, room temp
1/4 t. pepper*
4-5 cups of AP flour
Glaze:
1 Egg (could use only the yolk. . . ), room temp
1 T milk, room temp
Other equipment:
Potato masher
Spurtle*/wooden spoon
Sauce pan
at least 3 bowls (one for mashing, one for mixing and one for proofing)
Dough Scraper: I have THIS ONE
Razor blade
*(optional)
Instructions:
Prepare your pears! :) Peel, core and dice your pears. Place in a pot with 1/2 cup water and add spices. Let cook for about 10-12 minutes until all of the water is gone on medium heat, stirring occasionally. (this is the time that you can heat your milk in a double boiler). When the pears are done, it will be easy to swirl the pot and have the pears not stick but seemingly all of the water has cooked out.
Remove from the heat and mash until pretty smooth with a fork, food processor, or potato masher. Set aside to let mixture cool.
While Pears of cooking, get your other stuff ready! I like to line my sheets with silpat or parchment paper and get my "proofing" bowl greased.
Put yeast in warmed milk or water and set aside.
In a large bowl, put your oil, honey, salt and eggs together, whisking until you have a smooth liquid. This is the part that you can do 1 of 2 ways, but basically achieving the same outcome.
You can combine the pear mixture a little at a time into the egg mixture making sure to whisk as you go as not to cook the eggs THEN add the yeast mixture, OR add yeast mixture to eggs first and then the same small amount at a time of the pear mixture into the bowl. Either way, you get all of the WET ingredients combined. Just temper everything as to not kill the yeast OR scramble the eggs :)


.
NOW, we make the dough!!
Put 2 cups of flour on top of the liquid mixture and beat in with wooden spoon or Spurtle until all incorporated. Add a 3rd cup and mix until you start to get a "stringy/shaggy" mess. Once the dough starts to pull away from the sides of the bowl, it's TIME!
The next 4-7 minutes will feel like you're not doing it right, but remember once you activated the yeast, this is alive; it needs some TLC to become a beautiful dough!
YOU will NEED a DOUGH SCRAPER! Turn it out and finish adding up to 5 C of flour until you have a "pillowy" dough that isn't sticking to your hands any more. You should also be able to pull between your thumbs and it will stretch. If it "breaks", you need to knead some more. . .
Place completed dough into greased bowl, cover with a towel or plastic wrap and place in the oven with the light on. It just needs to be in a draft free place that's about 70-75 degrees .


After 1 hour, punch/deflate the dough and form it into a disk. the formal recipe is to cut into 2, but these are HUGE pieces. We cut into 6 or 8 here in our house. I like to cut the disk into 3 or 4 and then cut those in half.
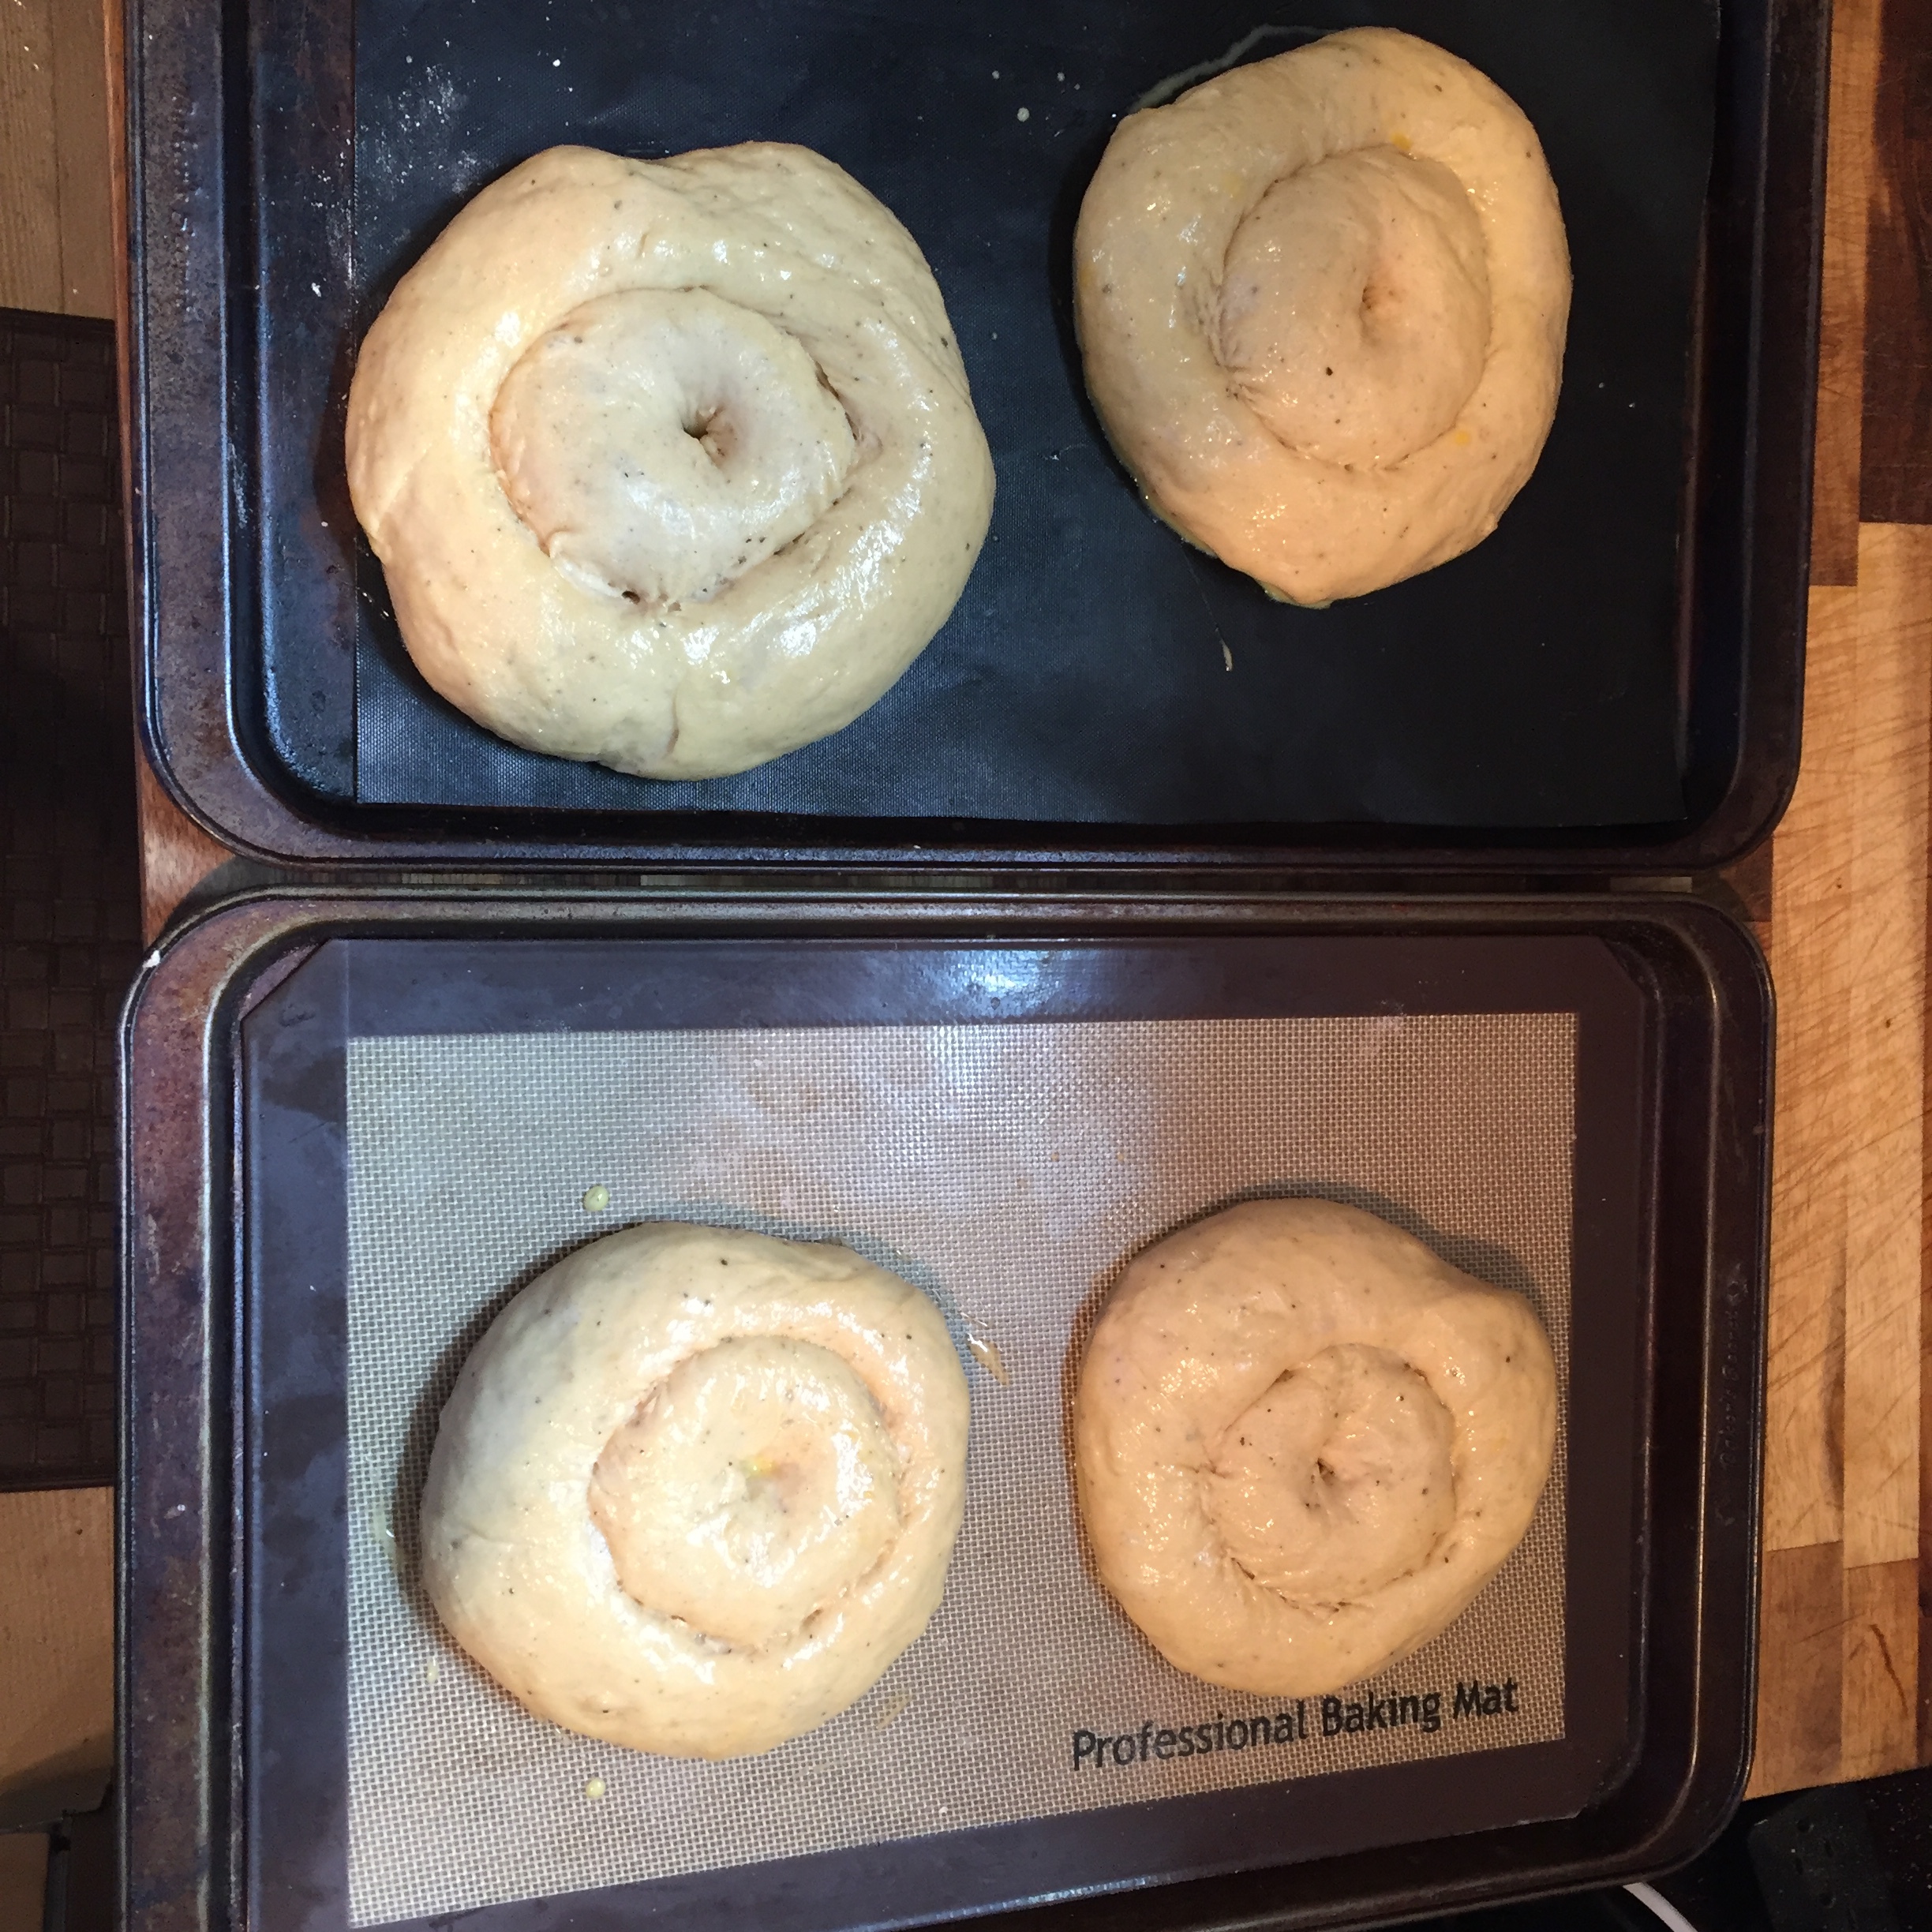
Form the smallest pieces that you come up with in a ball and let them rest for a couple of minutes. Then, flatten the balls a little and then poke your finger through the middle creating a "Couronne." It should look like a big bagel! Place on your parchment paper lined pans, cover with a towel and let them sit proof for 45-60 minutes. These will still be a little "sticky" but not crazy WET. . .
After 15-30 minutes into this final proof, turn on the oven to 350degF and let it start to preheat. As well, beat your Glaze together so that it becomes room temp and easier to baste onto the loaves.
Remove towels and baste the glaze (for a more "golden" look, use only the egg yolk) onto the Shapes. Take a SHARP knife or razor blade and cut the around so it looks as if there are a "crown" in the middle of the circle. . .
Depending on size, the baking could take from 20-40 minutes. The bigger the "Couronne", the longer it will take. "How do I know, will?" When they are golden, AND when tapped sound hollow, it's DONE!
and VOILA! You have Piquenchagne!
Pull it out and let it cool on a wrack and cut and serve! If these sound like a LOT to consume in a week or so, you could freeze 1/2 of it. Just allow to thaw out over night in the fridge, and they're good for use! Or give it to a neighbor, I've given it away to friends at work and they LOVE it.

This is our variation with about 4 oz. dough balls!

Hello Everybody!! The Food Hussy Joins me again to make a Pizza!
Check out her website here: www.thefoodhussy.com
Here's all you need:
Dough:
Wet:
2 C of Warmed water (I use hot tap water)
2 T Olive Oil (divided)
1 T minced garlic*
2 packages Active Dry Yeast: (4 1/2 t.)
Dry:
5 Cups All Purpose Flour
2 T Herbs de Provence*
2 t salt

*optional #bakingactor touches for more flavor
Toppings:
Olive Oil
Thinly sliced Fresh Mozzarella
Small crumbles Goat Cheese
Thinly Sliced Roma Tomatoes
Thinly sliced White Mushrooms
1 t minced Garlic
Dried or Fresh Basil or Oregano.
Extra Equipment:
Stand Mixer with Dough Hook Attachment
Pizza Stone
Instructions:
Dough:
To "bloom" yeast, In a stand mixer fitted with the hook attachment, combine yeast in with warm water, 1 T olive oil, sugar and minced garlic. I pour water in second to allow the yeast to all get wet. it'll take about 3-5 min. for the yeast to come to life.
While Blooming, Get Flour, Salt and Herbs de Provence together.
Once bloomed, Start to add Flour mixture 1/4 or 1/3 cup at a time. (If you've seen my out take on Instagram, the 1/4 cup fell into the mixing bowl in a very Julia Child "French Chef" moment!)
Mix until all flour is combined and "wet". Remove hook and scrape from sides of bowl. Cover with olive oil, plastic wrap and towel in Mixer bowl and let rise for about 45 min. - 1hr.
After an Hour, PUNCH/Deflate dough and then turn out onto a lightly floured surface. Knead for about 2 minutes until the dough is elastic. Place back in the bowl, cover with olive oil, plastic wrap, and towel and let it rise a second time.
About 30 Minutes in to the second rise, place pizza stone in the oven to warm up to 500degF. This is when you can get all of your toppings prepped too!
Once the dough has completed it's second hour of rising, punch/deflate again, and you're ready to make your pizza. Turn out onto a floured surface and divide into how many ever pizzas you would like! This recipe makes a TON of dough, so you could 1/2 it and have enough for 2-3 people for sure. OR you could make the whole thing and freeze 1/2 of it!
Once you've determined your dough size "disk" (I said that term so many times and couldn't edit it out LOL!) it and roll backwards on a rolling pin getting rid of any excess flour. Set aside.
After your oven is at least 475DegF (I have a thermometer inside to make sure the temp is accurate), take out pizza stone (If you have a PEEL, you don't need to remove the stone) bring the stone to your surface and roll dough off pin onto stone. Put toppings on dough swiftly as the stone is HOT, and it's starting to cook. Once assembled, put stone back in oven for 10 minutes for thin crust or 12-13 minutes for thicker crusts. Once the Crust will lift or slide around on Stone, it's DONE!
Remove from Stone/pan and let cool for a few minutes as it will be "hot like lava". Cut and ENJOY!
After the second rise, you're READY! and HUNGRY! LOL, but this is where you can be creative! We made a "white" pizza to avoid some complications with acid reflux, but you can use whatever your favorite toppings are. I'd actually like to know so I could try? Leave me a comment of your favorite combo of toppings!